Migrate from Allure Report 2
Allure Report 3 has been rebuilt from the ground up to offer an improved interface, more flexibility, and new long-requested features, while maintaining the maximum possible compatibility with test setups built for Allure Report 2.
This guide will help you transition your projects smoothly.
TIP
You will not have to change anything in the actual source code of your tests. Allure 3 maintains full compatibility with all official Allure adapters. The only thing that changes is the CLI report generator itself.
Install
For Node.js Projects
Add Allure 3 as a development dependency:
cd your-project
npm install -D allure
Run it like so:
npx allure <command>For Non-Node.js Projects
You have two options:
Option 1: Global Installation
Install Allure globally for command-line access:
npm install -g allureRun like any globally installed tool:
allure <command>TIP
If you already have Allure Report 2 installed globally, you may encounter naming conflicts when installing Allure 3 on top of it. If you want to keep both, you can use shell aliases to differentiate them.
Global installations, however, have some limitations. Allure 3 supports dynamic configuration files with executable code, which allow for very deep customizations. These won't work with a globally installed tool - it can only pick up static JSON or YAML configuration files.
Static configs still let you configure every Allure 3 option - just with static values. Look for more information on static and dynamic config capabilities in the configuration reference, and if you decide you need the full package, proceed to:
Option 2: Dummy Node.js Project (Full Configuration Capabilities)
Create a minimal Node.js project to unlock dynamic configuration capabilities:
npm init --yes
npm install -D allure
npx allure <command>
Configure
Configuration in Allure 3 is much more flexible than in version 2. Refer to the configuration reference for detailed options and capabilities.
Use
What Stays the Same
Framework Adapters
All your existing Allure adapters continue to work unchanged. You can run tests exactly as you did before, and you will get the exact same result files as with Allure 2.
Core Commands
The main commands remain essentially the same:
allure generate ./allure-results  # Generate report from allure-results directory
allure open                       # Open the generated report
Some command options change. You can always consult the built-in help to get the most up-to-date information on options:
allure --help               # All commands
allure <command> --help     # Command-specific help
New Capabilities
allure run wrapper command
Allure 3 introduces a wrapper command that supports many new features, such as:
- failed test reruns even when your testing framework doesn't natively support them
- multistage report builds - collecting test results from multiple data sources into a unified report
# This will rerun failed tests up to the specified number of times:

allure run --rerun <number of reruns> -- <test command>

# You can use it instead of running `<test command>` directly, for example:

allure run --rerun 3 -- npm test# This will save the full state of your run into the stage1.zip file
allure run --stage=stage_1 -- <test command>
# This will generate a report from all stage archives matching the "stage_*.zip" pattern
allure generate --stage=stage_*.zipImportant Changes Requiring Action
History Tracking
Allure 2 stored historical data files in an automatically generated folder, which you had to copy to the results directory for every new report generation.
Allure 3 simplifies this: now history is stored in a single JSONL file, that Allure writes all the necessary data to on each report generation. No more need to copy anything anywhere.
To enable history in Allure 3, simply set the historyPath config parameter.
Report Hierarchies and Grouping
Allure 2 automatically populates Behaviors, Categories, Packages, and Suites tabs with tests results grouped according to predefined logic.
Allure 3 can group test results by any labels in any hierarchy, but requires explicit configuration:
By default it creates a report with just one default hierarchy.
You can customize the default hierarchy however you want, and create additional hierarchies through configuration.

TIP
Categories are currently a work in progress and will be available soon.
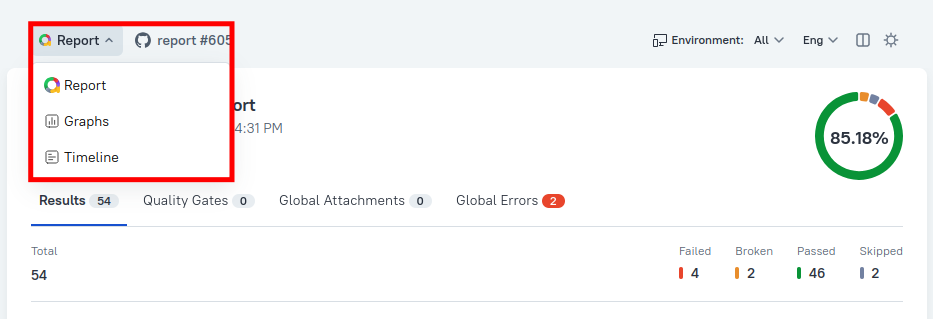
Timeline and Charts Location
Timeline and charts are now accessed differently:
- Click on "Report" in the top left corner of the homepage
- You can configure which charts are displayed
Entirely New Features to Explore
Allure 3 introduces significant new capabilities:
- Environments - Create multiple-environment reports and organize tests by environments.
- Known Issues - Track and manage known test failures.
- Quality Gate - Set up automated quality criteria for your test runs.
What's Still in Development
Most CI and dev tools integrations are still in development. Integrations that remain Allure 2-only are marked with the Allure 2 badge in the integrations section of the documentation.
Check the integrations page to verify if your CI platform or tool is supported in Allure 3.